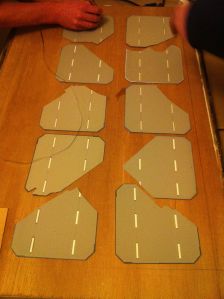
I went to a fun workshop in Brixton last weekend on making photovoltaic solar panels from recycled and scrap materials. I spent a fair chunk of last year at work building the Solar panel section of the uSwitch website so I was quite curious to get down and dirty with the physical technology.
Also, I was totally fascinated by the workshop’s title. Where the hell would recyclable solar panel materials come from? The answer: typically the solar cells are manufactured in China and shipped to Europe, but they are fragile so a substantial proportion of them get damaged in transit. The damaged cells can then be bought by the kilogram as pricey scrap. The rest of the solar panels is made up of old windows, bits of plywood and a couple of random bits and bobs from the DIY shop.
We split up into four groups during the workshop and built a panel per group. Luckily there were some people in my group with more DIY experience than me. There was a wide range of people from different backgrounds at the workshop and it was really interesting chatting and working with everybody. I have written a rough outline of the process below. If you want to actually build one yourself I would strongly recommend the Demand Energy Equality site for more detailed and reliable instructions. I accept no liability for anyone trying this at home!
Grouping similarly sized solar cells
Even thought the cells are damaged they can still generate electricity roughly proportional to their size. You need to group several cells of similar sizes to make a panel. All the cells should be roughly the same size as the output capacity of the entire panel is limited to the output of the smallest cell on the panel. These cells are placed on a big sheet of plywood.
Connect the panels with tabbing wire
Next up you need to connect the cells together with tabbing wire. This involved some soldering of the tabbing wire to the individual cells. I hadn’t done any soldering in about 20 years, but aside from a burn or two it was fun. After the wire has been soldered on some transparent silicon needs to be spoldged over the soldered area to prevent galvanic corrosion. Then a slightly larger metal buss wire is run underneath the bottom row of cells.

Finishing touches
To keep the cells in place you dab some cheap silicon sealant (normally used for bath tubs) around the cells. You then hammer a nail (!) through the buss bar. Cover the whole thing with a old window and you are (mostly) done!
Some thoughts
I really enjoyed the workshop:
- Making things with your hands is great. I definitely felt I was using different parts of my brain then usual in the workshop.
- After playing with raw solar cells I now feel they can be assembled and used in more interesting and varied ways than just the standard rectangular bank of cells.
- I’m no longer scared of soldering, which is great as I suspect I might be sticking a few Arduino type devices together this year.
- It was good to hear some different viewpoints on the Feed in Tariff (FIT).
- I found out about the really cool Brixton Energy project.
- The panels cost about 1/4 of the commercial equivalent, but obviously require some effort to build and maintain. Additionally, you may not get the FIT. At the moment I am still undecided about whether I want to build my own or not.


What is the list of materials used for this?
Hi Allison, there is a list of materials in the demand energy equality guide here http://www.demandenergyequality.org/build-your-own-panels.html